Call of Duty: Black Ops 7[1] arrives on November 14, but you can already go hands-on with the game during the BO7 beta. You’ll want to adjust some of the game settings to improve your aim and movement, and there’s also an intelligent movement setting to help with Black Ops 7’s new wall jump mechanic. This guide covers recommended settings for controllers, graphics, and audio settings in the Black Ops 7 menus.
Optimal settings are always going to be subjective, but here we detail our preferred options for console players on PS4/PS5 and Xbox One/Xbox Series X|S.
Best controller settings
Inputs
- Edit button layout: Default or tactical
- Stick layout preset: Default
- Horizontal stick sensitivity: 1.65 to 1.85
- Vertical stick sensitivity: 1.65 to 1.85
- Simplified controls preset: Off
- Low motor strain preset: Off
- L1 Button ping: Off
- Swap L12/R1 with L2/R2: Off
Controller
- Controller Vibration: Off
- Trigger effect: Off
Whether you choose the default or tactical button layout might depend on the type of controller you use. Black Ops 7 expands on last year’s omnimovement, bringing even faster and more fluid omnidirectional movement as well as the new ability to wall jump.
Tactical layout is recommended for those using a standard controller, as it maps your crouch/slide/dive button to the thumbstick, so you can be quick without ever needing to move your thumb. If you have something like a Scuf or another brand of controller that lets you remap the buttons, you can just leave this on its default setting.
Trigger Effect is something you definitely want to turn off for PS5. The immersion might feel cool, but for more precise aiming, you want to have this effect turned off.
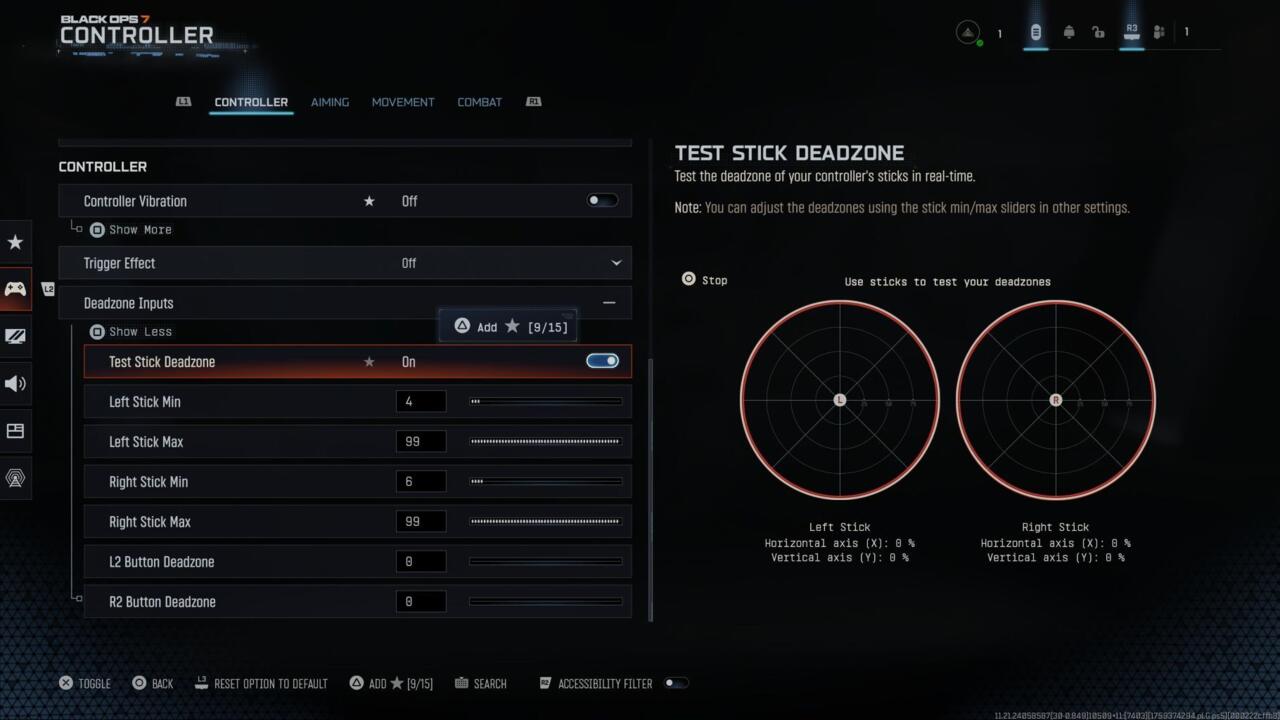
Deadzone

Deadzone Inputs:
- Left Stick Min: 0.3
- Left Stick Max: 0.99
- Right Stick Min: 0.4
- Right Stick Max: 0.99
- L2 Button: 0.0
- R2 Button: 0.0
Stick drift varies for each player’s controller, so your settings here will likely look different to another player’s. Thankfully, Call of Duty has a helpful feature for testing the deadzones on your controller, and it’s found right here inside the settings.
First, start on the default Deadzone settings, then turn on the Test Stick Deadzone setting. This test will give you numbers on the bottom of the left and right stick images. Whatever numbers it gives you, you want to adjust the minimum stick drift number for that specific stick to go at least one number higher than the number you’re given.
For example: If your left stick test shows a 3 and the right stick shows a 2, you want to adjust the minimum drift for the left stick to a 4 and the right stick to a 3. Then test again to make sure you don’t have any more drift.
Lastly, you’ll want L2/R2 set to 0.0 to make sure you’re getting instant activation.

Aiming
- Sensitivity Multiplier:
- 3rd person sensitivity multiplayer 1.00
- Ground vehicle sensitivity: 1.00
- Air vehicle sensitivity multiplier: 1.00
- Tablet sensitivity: 1.00
- ADS Sens. Multiplier (Focus): 0.90
- Look inversion (On foot): Standard
Aiming advanced settings
- ADS Sensitivity transitioning timing: Instant
- 3rd person ADS correction type: Assist
- Aim response type curve: Standard
- Custom sensitivity per zoom: Off
Aim assist
- Target aim assist: On
Motion sensor aiming
- Motion Sensor Aiming: Off
- Motion Sensor Advanced Setting: Off
Motion sensor aiming is PlayStation’s exclusive feature that uses motion-tracking technology to allow you to tilt the controller for aiming. This can serve as an accessibility option if you need it. Otherwise, this is a setting you’ll likely want to leave off, which is the default setting shown above.

Intelligent movement
- Sprint assist: Off
- Mantle assist: Off
- Crouch assist: Off
- Corner Slice: On
- Wall Jump Assist: Off or on
- Active Roll Assist: Off
Black Ops 7 expands on last year’s new Intelligent Movement settings, which are designed to get you moving and keep you moving with fewer button inputs. These settings are going to come down to personal preference, and I suggest playing around with them to see what you prefer.
There is a setting to help you perform the game’s new wall jump movement. Turning this on means that you can jump at the wall and the setting will perform the wall jump for you. You can also choose how the assisted jumps work by limiting it to only when you are facing a wall or only when a wall is on either side of you.
I think this can be a helpful setting for some players less savvy with movement and wanting assistance, but I probably wouldn’t recommend it for players who like to jump shoot/bunny hop, as it can create some unintended jumps if you’re too close to a wall.
Movement behaviors
- Slide/Dive behavior: Slide
- Automatic airborne mantle: Off
- Sprint Restore: On
- Sprint restore: On
- Slide maintains sprint: On
- Wingsuit activation: Manual
- Wall jump activation: Press
- Slide/active roll behavior Tap to slide
- Active roll camera: 1st person (3rd person looks weird)
Advanced Movement Settings
- Sprint/Tactical sprint behavior: Toggle
- Auto move forward: Single tap
- Auto door peek: Off
- Grounded mantle: Off
- Tactical sprint activation: Single tap sprint
- Plunging underwater: Trigger
- Sprinting door bash: On
Vehicle Behaviors
- Vehicle control mode: Driver control
- Scorestreak vehicle control mode: Aim-based control
- Vehicle camera recenter: Short delay
- Camera initial position: Free look
- Lean-Out activation: Melee

Combat behaviors
- Aim down sight behavior: Hold
- Weapon mount activation: ADS + melee
- Dedicated melee weapon activation: Hold Melee
- Body shield/finishing move animation: Prioritize finishing move
- Armor plate behavior: Apply all
- Quick C4 activation: All at once
- Equipment behavior: Hold
- Manual fire behavior: Press
Advanced combat behaviors:
- Focus behavior: Hold
- Change up directional behavior: Ping
- Change zoom activation: Sprint/Tactical Sprint/Focus
- Weapon mount exit: Short Delay
- Interact/reload behavior: Prioritize reload
- Mantle cancels reload: On
- Sprint cancels reload: Off
- Akimbo behavior: Independent (This lets you fire each weapon individually)
- ADS stick swap: Off
- Depleted ammo weapon switch: On
- Weapon mount movement: On
- Weapon mount return: Off
Overlay behaviors
- Inventory control: Directional buttons
- Ping wheel delay: Moderate
- Double tap danger ping delay: Moderate
- Emotes and sprays wheel position: Default
Best graphics settings for console

Display
- 120 HZ refresh rate (If applicable): On
- Eco mode preset: Efficiency
Quality
- World motion blur: Off
- Weapon motion blur: Off
- Depth of Field: Off
- FIDELITYFZ CAS: On
- FIDELITYFZ CAS Strength: Choose somewhere between 50 – 80
Details and textures
- On-Demand texture streaming: Optimized
- Allocated texture cache size: Auto
- Download limits: On or Off (This depends on if you’re being mindful of data usage/data caps)
With the download limits on, you can cap how many GBs are downloaded daily for textures.

View
Accessibility solutions:
- Motion reduction: On/off is personal preference
- Arachnophobia mode: On/off is personal preference, and this is used only for Zombies mode
For the motion reduction setting, I personally use this because I’m sensitive to motion sickness. This is a good setting to turn on if you find that you’re sensitive to the movement as well.
Field of View
- Field of view: Choose somewhere in the 90-120 range
- ADS field of view: Affected
- Weapon FOV: Default
- 3rd person FOV: 90
- Vehicle FOV: Default
The higher you set the field of view, the more you can see, but it also zooms everything out. For the field of view, the settings let you go all the way to 120, but this tends to leave you feeling zoomed out too far. It’s all personal preference here, but I recommend testing somewhere between 90-120.
Camera
- First-Person camera view: Least 50%
- 3rd person camera movement: Least 50%
- 3rd person ADS transition: 3rd person ADS
- Inverted flashbang: Off/On personal preference
Inverted flashbang is a good setting if you are sensitive to bright flashes. This will turn the flash into a quick black screen instead.
Best audio settings
Volumes
- Master game volume: 70-100
- Gameplay music volume: 25-30
- Dialogue volume: 80-100
- Effects volume: 100
- Cinematic music volume: 50 or less
Once again, everything remains super loud in Call of Duty games, but you don’t need everything at max volume to make the most of the experience. Personally, I like to greatly lower all the music and slightly lower the volume of everything except the effects volume.
The effects volume is going to include the game’s precious footstep audio, so I’d never suggest turning that one down. You want to hear those footsteps at 100. Dialogue volume includes important announcer callouts about enemy scorestreaks and such, so you don’t want this sound turned down too far either. I’d recommend not going lower than 80 here.
Global
- Audio mix: Home Theater or Headphones Bass Boost
- Mono audio: Off
- Mute licensed music: On or off
This setting is the hardest to list because it can be a lot of personal preference and dependent on what device you’re using for audio. Home Theater or Headphones Bass Boost is a great option for audio quality.
If you’re planning on streaming and/or uploading videos for Black Ops 7, you’ll want to mute the licensed music so you don’t get hit with copyright strikes.
Functionality
- Reduce tinnitus sound: On/Off
- Hitmarker sound effects: Default
I personally like the Reduce Tinnitus Sound turned on to reduce the sometimes extreme sound of the flashbang and concussion grenade effects, but you should try what’s best for you.
Overall, adjusting these console settings should help you get the best aim, movement, audio, and visuals for Call of Duty: Black Ops 7.
References
- ^ Call of Duty: Black Ops 7 (www.gamespot.com)
- ^ show (www.gamespot.com)